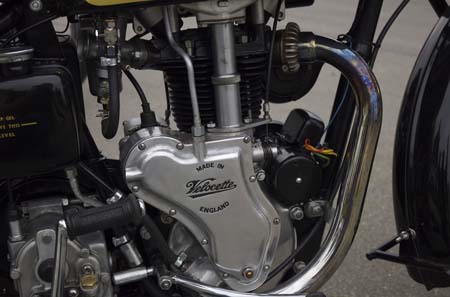
1946 Velocette MAC 350 by Greg Williams
My 1946 Velocette MAC, a 350 c.c. single cylinder motorcycle made in England. This was a pile of parts in boxes when I bought it, and it took two years to collect the missing parts and finish the restoration.
Read the story…originally published in Walneck’s magazine in 2004.
VELOCETTE MAC RESTORATION
When it comes to finding a motorcycle to restore the possibilities are endless.
There’s the basket case project, with boxes of bits and pieces that might belong to what the seller has told you he is selling.
There’s the complete but crusty motorcycle which requires a full rebuild.
And there’s the ‘as last used’ machine, proudly wearing a little bit of patina, which can be cleaned up and made to go again.
I like to find motorcycles that fall into the last category–they’re only original once. Often tucked away and forgotten about, usually all these bikes need is a thorough cleaning, inspection and service to be made a runner once more.
But it was a different story when I located the 350 c.c. 1946 Velocette MAC. It was an abandoned restoration project, and a great deal of money had already been spent on parts and an engine rebuild. But once the engine had been mounted in the frame, the rebuild stopped. The project was actually halted for want of a front wheel, or even a hub, that would fit the Webb girder forks.
So, why did the proverbial basket case Velocette catch my attention?
It was a single-cylinder motorcycle, and I’d been looking for an old single. I also knew it would be an interesting machine when it was restored, as a Velocette is a bit more esoteric than the average British motorcycle. Sure, I thought, there would probably be difficulties finding some parts, but since this was ‘my’ restoration project I wasn’t too worried about the machine being 100 per cent authentic. I never agreed to buy the Velo with the intention of it being a concours restoration. I wanted to build it to ride.
After money changed hands in October, 2002 the Velo project rode home in the back seat of my wife’s Volvo. The frame and engine sat on the seat, while boxes of components filled the rest of the space.
Once ensconced in the home workshop, I set the frame and engine on a simple stand and started to inventory the parts that came in the boxes. Luckily, a parts book was included in the transaction, and I made photocopies of this important document which was to become my constant reader for the next year.
After emptying the boxes and spreading the Velo parts on the counter, I realized the basket was very full. I had several of the hard to find items such as the Miller 6 1/2 inch headlight and lens, the D-shaped tool box, the Smiths speedometer, and a brand new exhaust pipe and fishtail muffler.
That said, there were some missing pieces. The AWOL items included the front wheel/hub, Miller generator and front fender and stays. Several of the items I did have would require work, such as the oil tank, fuel tank, rear wheel/hub and the rear fender.
Ah well, nothing to do but get after it. Apart from photocopying the parts book and locating a Velocette owner’s manual, the next step I made was to join the Velocette Owner’s Club of North America (VOCNA). With my ‘wish list’ I contacted several Velo owners, and quickly learned the front wheel/hub was going to be very difficult to find.
Ed Gillkison operates Velocette Service–Spares, Repairs and Accessories for Proper Motor-Cycles in Lakebay, WA (http://velogb.tripod.com). He advised that an original front hub, if located, would be very expensive. So he suggested I contact Bob Strode, another Washington Velocette enthusiast who has been known to turn a front hub from a mid-1970s Honda XL350 into a Velo-style hub.
I visited TJ’s Cycle in Calgary–a local motorcycle wrecking yard–and bought a 1976 XL350 front wheel, took it apart and sent the hub to Strode. He turned the hub around in less than a month, modifying the brake plate, shaving off the ribs and machining up an axle.
Now for front and rear rims. I contacted Central Wheel Components (CWC) in England, and samples of the spokes and specified front and rear hub dimensions were sent overseas. Although the Honda wheel was originally a 21 inch item, I required a 19 inch rim–which CWC supplied–but they sent me back spokes as though I were lacing a 21 inch rim. Oops, spokes sent back to CWC where they were shortened and returned.
Now that I had wheels I felt we were getting somewhere, and I continued to bolt various parts to the frame in a ‘dry assembly’ procedure to ensure everything fit. Although the engine was rebuilt as purchased, I dismantled the gearbox and installed new bearings and shifter selector rods.
A mounting tab for the oil tank was fabricated, as at some point the original had been lopped off. Going by photographs alone, I cut and drilled the tab in preparation for welding. By gosh, there’s a skill I wish I had–and I rely on a very talented local welder/machinist who works out of his own shop and charges minimally for the odd jobs I bring him.
Parts continued to be refurbished and bolted on, but the time had come to do something about mudguards. The two-piece rear fender was a mess, with huge rust holes in the top of the front half and a mismatched rear half. Again, my local welder/machinist had a plan. He cut the front half from the original, welded it to a reproduction ribbed item, and presto a rear mudguard.
Yes, it was more involved than that, but the end result was very satisfying. A generic aftermarket front fender blade was crimped to clear the girder forks, and stays were fabricated for that item.
With the bike fully assembled in a mock-up state I took several photographs so I would have visual reminders of how everything went back together. As I proceeded to take it all apart again, I kept extensive disassembly notes in a coilbound book.
Every metal component was stripped of its finish, whether rust or paint, in my glass bead cabinet. The frame and front fork blades were sandblasted. It took about a month to prepare and clean everything, including the fasteners.
All frame, fork and associated items were powder coated Vulcan black, a semi-gloss hue that doesn’t give an ‘over-restored’ appearance. Luckily, very few items on the Velo required chroming, but the headlight rim, kickstart lever and gear change lever were all cleaned up and dipped. I did take the time to file nicks out of the nuts and bolts and then cleaned them up in the glass bead cabinet prior to having them cadmium plated at an industrial plating facility.
Front and rear fenders, fuel tank, oil tank, headlight bucket and licence plate bracket were painted and decaled by Craig Cooksley of Bentley’s Moto Sicle Pain’ Tin, a central Alberta vintage enthusiast who paints nothing but motorcycles.
1946 Velocette MAC 350, Greg Williams owner, photo by Mike Stahl
Despite my care and attention, there were a few hitches putting everything back together. On the Velocette MAC the bolt which holds the generator strap to the motor can only be accessed with the motor out of the frame. I didn’t realize the generator strap was incorrect until it was too late. Out came the motor while a proper strap came all the way from Australia.
The Miller generator came from a California VOCNA member, and was professionally rebuilt by Douglas Wood of Pennsylvania (dougwood@netzero.net). He did a tremendous job and guarantees his work for two years. A Podtronics sold-state regulator handles the current the Miller produces, and I made the wiring harness using wire and components sourced from British Wiring Inc. (www.britishwiring.com).
By May of this year (2004) my Velocette had come together. And it does run. Of course, teething problems were real and required much focused attention until they were finally under control. I’ve only been able to log 96 miles to date, but am pleased with the performance and handling of this British motorcycle.
For the purists who cringe at the thought of a Honda front hub and brake, I can only say it makes the Velo stop that much better. And at least those bits and pieces are out of the boxes and reassembled to get one more 1946 Velocette MAC back on the road.
SIDEBAR
I’m no restoration expert, but here are a few tips that helped me give this 1946 Velocette MAC a new lease on life.
–Study parts books and owner’s manuals, and make a detailed list of missing items.
–Determine if parts on hand will be salvageable, or if replacements are necessary.
–Make contacts through a marque-specific owner’s club, browse swap meets, and peruse the ads in Walneck’s.
–If a certain skill is required, locate someone who is a professional. (I’m always willing to learn, and while several items such as the horn bracket, rear brake rod, rear brake steady, head light brackets and some small spacers turned up on a bench metal lathe were my handiwork, the fabrication of a rear mudguard for the Velo was beyond my limitations.)
–Perform a dry assembly, but still expect the unexpected. The dynamo mounting strap is a prime example (see story).
–Photograph everything before leaving items for powder coating, chroming or painting. A visual record is an easy way to ensure all pieces are returned.
–Take your time during reassembly, have fun, and above all, enjoy the fruits of your labors.
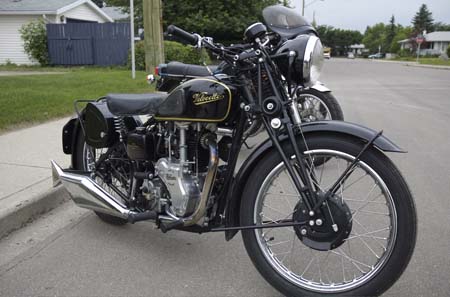
1946 Velocette MAC 350, Greg Williams owner, photo by Mike Stahl
This Post Has 0 Comments