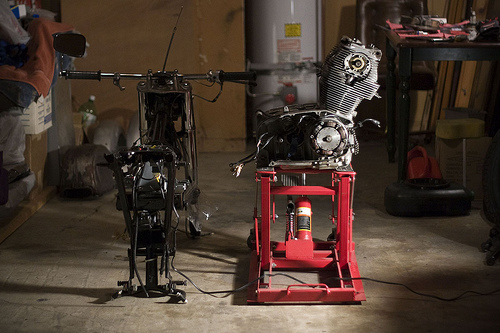
Photo by Scott Pargett
This story first ran in the Fall 2007 issue of the Antique Motorcycle, the publication of the Antique Motorcycle Club of America.
Some of the photos, as noted, are by Scott Pargett. You need to see his Flickr photostream as he details the restoration of his 1962 CB77. Please visit his site by clicking here.
Honda’s Super Hawk dramatically changed the face of the motorcycle world. No other motorcycle before it contained as many features for so few dollars. Powered by an inclined vertical twin engine that could be revved to 9,200 r.p.m., the bike also included 12-volt alternator electrics, electric start, chain-driven overhead camshaft and wet sump lubrication. Perhaps the biggest plus was the fact the Super Hawk didn’t mark its spot wherever it was parked.
In 1961, when the Super Hawk was introduced, it seemed acceptable for a British or American made machine to ooze and dribble lubricant. But with Honda’s horizontally split crankcases and proper seals around kickstart and gearshift spindles the Super Hawk was virtually oil tight.
In America, Honda introduced both the CB72 Hawk and CB77 Super Hawk at the same time. The smaller machine, the CB72, featured a 247cc engine. The CB72’s bigger brother, the CB77, had an odd displacement of 305cc’s. Regardless, the CB77 Super Hawk was really a firecracker.
One only need read the Cycle World Road Test of 1964 to understand the impact the Super Hawk really had. “Never before, in the entire history of motorcycling, has one company done so much in so little time,” Cycle World enthused in its report. “There are, naturally, excellent reasons for this progress: from top to bottom, the Honda line of motorcycles features good performance, good handling, good quality, and a high degree of technical refinements. The fastest and most refined of all Hondas is the CB77, and it is a remarkable machine in many respects.”
Let’s take a look at some of those respects.
One of them would be the tubular steel frame that used the engine as a stressed member. Developed from Honda’s racing machines of the late 1950s, the frame was stronger and considerably lighter than most other motorcycle chassis’ in use at the time. A large-diameter backbone (it measures close to 1 1/2″) curves from the headstock down to where the rear swingarm pivots are located. A trellis-like arrangement of smaller diameter tubes runs from the base of the headstock back to the backbone, and this is where the engine is held at the top. Substantial pressed steel brackets — welded to the backbone — bolt up the engine at the rear. More tubes, triangulated behind the backbone, carry the battery tray and toolbox and also provide the mounting points for the top of the rear suspension units and the base of the dual seat.
Another respect is the double-leading shoe eight-inch brakes front and rear. These were considered quite potent stoppers for their day, but complaints were heard from owners that the DLS arrangement wouldn’t hold the bike from rolling backwards when stopped on a hill. Both front and rear brakes are cable operated. Those brakes are at the center of 18″ wheels front and rear, with a 2.75-18″ tire up front and 3.00-18″ out back.
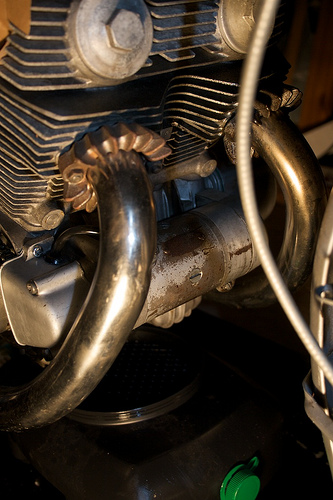 Photo by Scott Pargett
And last but not least is the all-alloy electric start Super Hawk engine. With its 305cc’s, the twin-cylinder engine produces 28 horsepower at 9,000 r.p.m. Lubrication is via wet sump, and the oil used in the engine also looks after the unit-construction four-speed gearbox, clutch and primary chain. A single overhead camshaft is chain-driven, with the drive sprocket placed directly in the middle of the crankshaft. Twin 26 mm Keihin carburetors feed fuel to the forward-canted engine. Early Honda twins featured 360-degree firing intervals, which means both pistons rise and fall at the same time. But the Super Hawk engine features 180-degree firing intervals; as one of the pistons goes up, the other goes down. Roller bearings support the pressed-up crankshaft, and connecting rods are one-piece items.
Hop-up parts for the Super Hawk engine were readily available. Honda offered a line of performance items, and the aftermarket parts industry also got involved. The August 1964 issue of Cycle featured an article, Road Racing the Honda Super Hawk, which details some of the modifications made by owners and racers, such as big bore piston kits and valve train improvements. With a stock 351 lb. curb weight, many of these racers pared the Super Hawk down to 275 lbs.
“It’s a remarkable engine, and most (stock) Super Hawks I’ve had will go 100 m.p.h.,” says Bill Silver, otherwise known as “MrHonda”. Silver has written extensively about all of the Honda twin-cylinder models, including the Dream, Scrambler, Hawk and Super Hawk, and has become something of an authority regarding these models. His self-published restoration guides and Classic Honda Motorcycles book, part of the MBI Publishing Co.’s Buyer’s Guide series, contain plenty of information regarding early Hondas. “And it’s some remarkable engineering expertise that went into those designs (of the twin-cylinder Honda motor).”
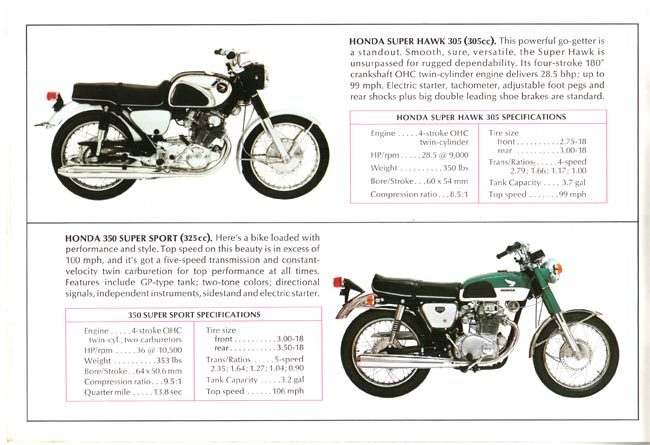
A scan from the 1968 Honda brochure, showing the CB77 and its replacement, the CB350.
The Super Hawk had a six-year model run, from 1961 to 1967. Production stopped in ’67, but Super Hawks were still available through to 1969. Super Hawk’s were replaced in 1968 by the CB350. In the U.S., 3,479 250cc Hawks were sold between 1961 and 1966. And between 1961 and 1969, 72,396 305cc Super Hawks were sold, definitely making this the most popular model of the two. In 1964, $665 would buy the CB77 brand new. Thousands of first-time riders cut their teeth aboard a Super Hawk, and author Robert M. Pirsig, of Zen and the Art of Motorcycle Maintenance fame, also rode this model.
During the Super Hawk’s six-year run several small changes were made to improve reliability and performance, and while parts may look similar, they do not always interchange. This article will attempt to touch on a few key areas in respect to restoring a Honda Super Hawk motorcycle. While focused on the Super Hawk, it would be prudent to keep in mind that some of these tips hold true when it comes to restoring just about any motorcycle — regardless of country of origin.
If shopping for a Super Hawk, Silver says, “Buy the very best one you can find to begin with, rather than grabbing a couple of basket case machines.” He adds: “But it does depend on the individual doing the restoration.” Just how patient and up to the challenge a restorer is will make a difference. “There were many changes across the series, and just because it’s a Super Hawk part doesn’t mean it will fit another Super Hawk,” Silver says. Forewarned is forearmed, as the popular idiom proclaims.
Let’s assume it’s a complete, but tired, Super Hawk motorcycle we’re looking at. Start by taking as many pictures of the machine as possible, from every angle. Think about shots of the entire motorcycle, and then start working in to include smaller detail shots. The more photos, the easier it will be to ensure the bike goes back together the way it came apart. Good advice, you’d think. Too bad I can’t follow my own. I’m currently at work on a 1966 Honda Super Hawk, and I took only a few photos. I now wish I’d taken hundreds. Regardless, while taking the pictures, have a pad and pencil handy and jot down any disassembly notes. And when I broke down my Super Hawk I was making my parts list as fast as the bike came apart.
Always try and keep electrical items together, and the same with any fragile bits such as head or tail light lenses. Speedometers should also be handled with care. I like to have boxes of two or three different size Ziploc plastic freezer Baggies on hand, and will put as many pieces of related sub-assemblies as possible into the bags. A good Sharpie marker helps to keep track of what’s what in the Ziplocs. Trust me, it’s not always so obvious — even if it seems so at the time.
Large pieces are best set aside, and once the machine is apart it’s time to formulate an attack plan. It’s good to know just how far you want to go. If the restoration is purely for cosmetic reasons, it will be simple to sandblast, glass bead, or otherwise remove the old finish on the frame, tank, fenders and other tins, repaint, clean up other components and reassemble. But wait. If the original finish is still intact in certain spots, it would be worthwhile to get it color matched at an autobody paint supply shop. Honda never used a primer coat on their early bikes. I discovered on my machine, which was finished with a black frame, swingarm, and center stand and red gas tank, forks, and side covers that hiding underneath all of that paint there was white paint. The bike was originally white, which is a very uncommon color.
Super Hawks came in four colors; scarlet red, black, royal blue and white. Red and black were the most popular, with blue and white somewhere further down the list. The frame, swingarm and toolbox are the same color as the chain guard, gas tank, front fork ears, lower triple clamp, upper fork covers, fork legs, headlight shell and side lift handle. Side covers, fenders, horn cover, engine side covers and starter motor are finished in silver.
Except when it comes to the 1966-67 Super Hawks. These bikes have what are called Type II forks, and the lower legs on these are made of alloy, not steel. These legs are painted silver. And this is where it’s important to know exactly what year and type forks are on your Super Hawk. Mis-matched fork parts between the types will cause woes further down the road, as the triple clamps feature a different offset. That said, Silver says: “There are (also) at least three different types of Type I legs, and three different fork covers. You always have to be really conscious of (what you’re working on) and not just grabbing parts off eBay.”
Determine what needs to be cleaned and prepped for refinishing. On my Super Hawk everything needed a good de-greasing before I could really see what I was working with. Even though I’d thoroughly cleaned the bike before taking it apart, the frame, swingarm, gas tank and fenders were still grimy. Once de-greased, those items were sent for media blasting, while the rest of the smaller pieces fit inside my own small glass bead cabinet. When the various parts came back from blasting I went over them to ensure all brackets were straight, and that any damaged threads were repaired.
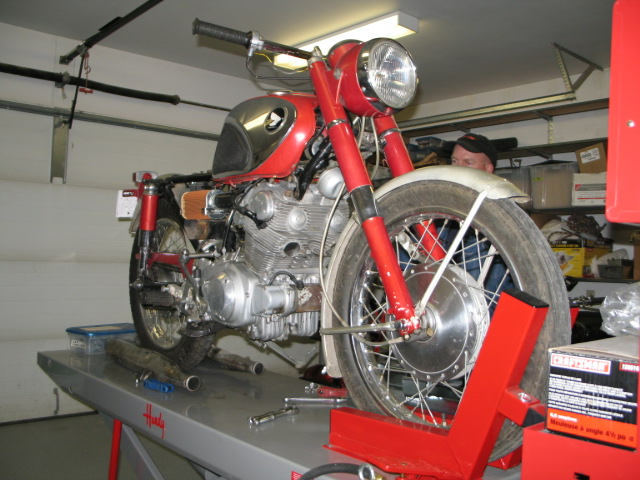
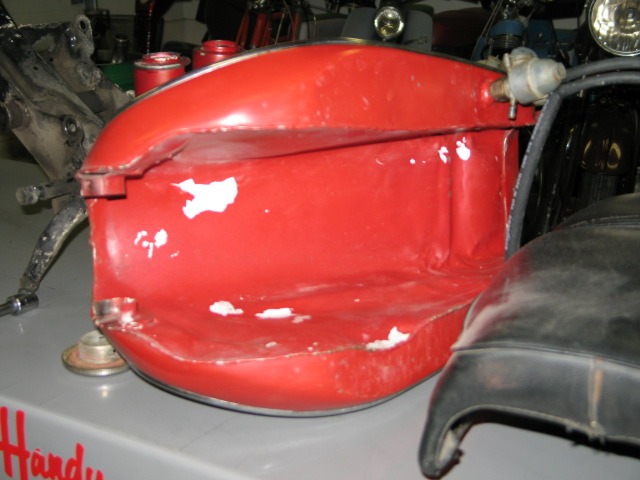 Evidence of the white paint can be seen on the underside of the gas tank.
The chainguard and fenders needed some panel beating, and all of the dents were removed. The flashy chrome panels on the sides of the gas tank really help set the Super Hawk apart in a crowd. My panels had a few nickel-sized dents, so I relied on a professional panel beater to remove those in preparation for chroming. The only other chrome plating my bike requires are the handlebars, everything else has polished up nicely.
Most of the metric fasteners that had been holding my Super Hawk together needed a little attention. I dressed up the flat edges of bolt heads and nuts (without removing too much metal) and tried to address the worst of the nicks with a file. Once cleaned up, I popped the fasteners in the glass bead cabinet for a quick blast. If you have a home plating kit, chances are you’ll be careful with your parts and won’t lose any of them. If you’re sending them out to a commercial plater for cadmium plating, then I suggest smaller items such as several washers and nuts can be strung together on a looped piece of wire.
I won’t go into details about rebuilding the engine. I will, however, note a few important items. Honda’s 305 engine features eight cylinder head acorn nuts. These are special acorn nuts. Not just any metric acorn nut will properly torque down, as they are not as deep as the originals. What happens is the nuts will thread down the studs but bottom out before reaching the proper torque, causing oil and compression leaks.
Another engine note is Honda’s use of a chain-driven oil filter. This little device sits inside the left engine or clutch cover, and spins on a shaft. And there’s been some confusion over the placement of a thrust washer — does it go inside, between the filter and the engine case, or outside between the filter and the steel pin at the end of the shaft? The washer isn’t even shown in the parts microfiche, but Silver says: “The washer needs to be outside, against the steel pin. I’ve taken apart engines where the washer was on the inside — and the result is a mis-aligned filter. The teeth (for the small drive chain) have been worn out on both the filter housing and the adjacent sprocket.”
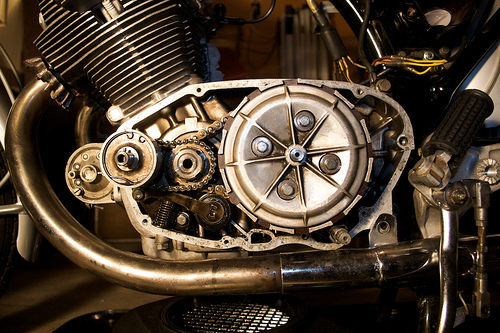 Photo by Scott Pargett
While the left cover is off, Silver suggests inspecting the clutch, as often the plates will be glued together if the bike’s been sitting for a long period. Also take a look inside the cover itself to see if the primary chain has been whipping up and rubbing on the case. If it has, it’s a good indication that the primary chain is stretched. And, it will be a hard item to replace as it has an odd pitch, and original Honda items are rare. Silver looked into having some chains reproduced, but was quoted a high-dollar figure for a batch of 1,000 chains.
“Honda built 250,000 of the 250 and 305 twin-cylinder motors, and I’ll bet probably every one of those bikes that remain out there needs a new primary chain,” Silver says. In other words, if you can’t find a replacement primary chain and you plan to ride the bike, take it easy. Or, try to find a better one than what you have. The chains were the same in all of Honda’s twins, including the Dream and Scrambler models.
Engine side covers are finished in a silver color, and are best painted at the same time as the rest of the silver pieces of the bike. There is a lot of metal to paint when restoring a Super Hawk, but thankfully most of it is just one color.
And that’s about as far as I’ve come with my Super Hawk rebuild. The final assembly hasn’t yet begun, and there are still items to detail such as the wiring harness, tail light, controls — it might be next year before we see a final product.
SOURCES:
I have had success in obtaining parts from:
– RetroBikes Vintage Honda Parts in Port Angeles, WA: www.olypen.com/retro
– CMS parts in the Netherlands, plenty of NOS Honda items, and an online parts microfiche system: www.cmsnl.com
And information from:
– Michael Stoic, webmaster of www.honda305.com, and the honda305.com forum
– Bill Silver, publisher of his own Honda restoration guides, www.vintagehonda.com or email to:william.silver@gmail.com
Here’s a list of suggested paint codes, from the www.honda305.com forum on Paint:
-silver: DuPont Imron 45040U
-red: DuPont Imron 6543U
-black: DuPont Imron 99U
-blue: DuPont Imron 63203UH
-white: no available paint code


 Photo by Scott Pargett

 Evidence of the white paint can be seen on the underside of the gas tank.
 Photo by Scott Pargett